Skip to Primary NavigationSkip to ContentSkip to Footer
  • Personal
  • Business
  • Enterprise
  • Deals
  1. Help & Support - Optus/
  2. Articles/
  3. Setting up your Optus Ultra WiFi (Gen 2) LTE Modem

Setting up your Optus Ultra WiFi (Gen 2) LTE Modem

Our WiFi 6 enabled modem is more powerful than ever before*, particularly when connected to a WiFi 6 enabled device. Paired easily with the Optus Ultra WiFi (Gen 2) booster, it gives you WiFi in more corners of your home. The modem is also made of 95% recycled plastic and Optus has removed single-use plastics from all the packaging.

(*Based on comparison with Optus Ultra WiFi (Gen 1) modem. Actual speeds may vary and are limited by the plan speed)

Important: The Gen 2 LTE modem and Gen 2 booster are only compatible with other Gen 2 modems and Gen 2 boosters. A Gen 1 modem (i.e. Sagemcom 5366TN, Optus Ultra WiFi (Gen 1 5366 LTE) is only compatible with a Gen 1 booster.
There are a couple of things to set up on your device before you start enjoying your Optus Ultra Wi-Fi (Gen 2) Modem.

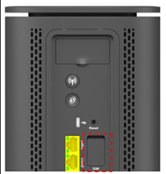
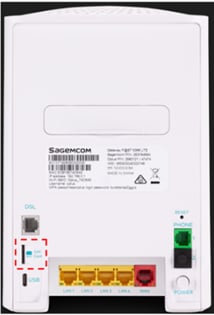
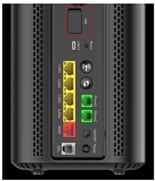
If you already have an existing modem (i.e. 5366LTE modem), you will need to eject the SIM card out of the modem and insert it into the new modem.

(Gen 1) 5366LTE Modem - Sim Card Location

(Gen 1) Sagemcom 5366LTE Sim Card Location

(Gen 2) 5393LTE Modem - Sim Card Location

(Gen 2) 5393LTE Modem - Sim Card Location


(Gen 2) JD6970 Modem - Sim Card Location

(Gen 2) JD6970 Modem - Sim Card Location


Once this has been done, download and follow the Quick Start Guide (QSG) for your relevant technology type. Check your order confirmation and SMS to confirm your technology type. To find the QSG, see Modem user guides for Home & Office Internet.

You can also find modem support at out Optus Ultra WiFi (Gen 2) LTE Modem device guide. 

Security Note. IoT (Internet of Things) devices (i.e. Smart lights, Smart doorbells etc) are known for having less security and vulnerabilities as they're not kept up to date with the latest security fixes. It's highly recommended you keep all your IoT hardware on its own network away from your main network.

If your IoT devices are not able to connect to WPA2/WPA3 you'll need to follow the below. If you have devices set up on your existing network and you are changing to this method, you'll need to re-establish connectivity with the IoT hardware. (WPA method is at your discretion).

Refer to the steps below under Enable Guest WiFi.

To check what each light signal on your modem means, go to What do the lights mean on my Home Internet modem?

You can also find modem support at out Optus Ultra WiFi (Gen 2) LTE Modem device guide. 


Troubleshooting steps

  1. Open web browser and in the address bar type 192.168.0.1
  2. Prior to logging in, you'll see the modem settings landing page
    • LED Status: Displays the status of the LED's of what you'll see on the front of the modem
    • Modem information: Displays details on your uptime of the modem, software version, connection type, the IP Address Optus has provided you
      • If you're using 4G Back Up - it displays the APN that has been provisioned, the IMEI of the 4G Modem and the functionality to change the LED brightness on the front of the modem
    • Mesh units: Displays a summary of the Mesh hardware (if you have Mesh connected in the home)
  3. Under Login, enter the password found at the base of your modem
  4. Click, Login
  1. Open web browser and in the address bar type 192.168.0.1
  2. Under Login, enter the password found at the base of your modem
  3. Click, Login
  4. Once you're logged into the console, click My Wi-Fi
  5. You'll notice as a default, Band Steering is turned ON. This means the modem broadcasts a single SSID for both 2.5GHz and 5GHz
  6. To change the SSID to your current SSID, add the SSID name in the Wi-Fi Name field
  7. Under Wi-FI Password, enter your current password that is used on your existing modem
  8. Click, Apply. This will send your existing SSID settings to your new modem

Using 2.4GHz and 5GHz with a different SSID and password?

  1. Toggle Band Steering OFF. This will display the settings for 2.4GHz and 5GHz where you can change the SSID and password
  2. Click, Apply

Note. If you've previously used the 5GHz SSID and you're using Band Steering, your device will need to ensure it connects to the new SSID you have changed the modem to. As the screenshot shows, the 5GHz channel has a different SSID naming convention than the 2.4GHz.

Tip! By changing the SSID (network name) and password on your new modem to the same SSID and password you used on your old modem, you shouldn't have to reconnect all of the WiFi devices around the house. When WiFi devices (TV's, phones etc.) try to connect to a network, they utilise any stored details you previously told them to use.

  1. Log into the modem settings once you're connected via a yellow LAN port or via the out-of-the-box wi-fi settings
  2. Open web browser and in the address bar type 192.168.0.1
  3. Under Login, enter the password found at the base of your modem
  4. Click, Login
    Note. Ensure you're connected to a yellow LAN port or via the out-of-the-box Wi-Fi settings.
  5. Once you're logged into the console, click My Wi-Fi
  6. Select, Guest Wi-Fi
  7. Enable Guest Wi-Fi: toggle to ON
  8. Guest Wi-Fi Name (SSID): Enter an SSID name
  9. Wi-Fi Security: Select, WPA Personal
  10. Wi-Fi Password: Enter your password
  11. Click, Apply
  1. Open web browser and in the address bar type 192.168.0.1
  2. Under Login, enter the password found at the base of your modem
  3. Click, Login
    Note
    . Ensure you're connected to a yellow LAN port or via the out-of-the-box Wi-Fi settings.
  4. Once you're logged into the console, click Settings
  5. Click, Maintenance
  6. Click, Logs (located on the left navigation menu)
  7. Select, Debug or higher, then click Apply
  8. Attempt to replicate the problem for the next 15 minutes
  9. Once replicated, download the bug file, and place the log file in the Bug folder

Note. No personal information is provided in these files.

Related Articles

How to pay your bill

Your bill explained

How to request more time to pay your bill

Change ownership of your service

A guide to eSIM

Popular articles

Orders, deliveries & returns

How to check network status & outages

Home Internet WiFi username & password help

Home Internet troubleshooting

Get in touch

  • Get My Optus app
  • Contact us
  • Find a store

Need more help?


Getting started


Billing and recharge


Troubleshooting


Device Guides


5G Mobile


Broadband & NBN


Manage my account


Optus Sport


Email


5G Home Broadband


Entertainment


Coverage and travel


Home phone


Business


Consumer advice


More from Optus

  • My Optus App
  • SubHub
  • Accessories
  • Student Hub

Customer Service

  • Contact Us
  • Help & Support
  • Store Locator
  • Payment Assistance Policy
  • Feedback & Complaints
  • Report a service outage

About Us

  • About Optus
  • Careers
  • Corporate Information
  • Media Releases
  • About Singtel
  • Accessibility

  • Blog
  • Connect With Us on facebook
  • Connect With Us on instagram
  • Connect With Us on tiktok
  • Connect With Us on linkedin
  • Connect With Us on twitter
  • Connect With Us on youtube

  • Critical Information Summaries
  • Standard Agreement
  • Privacy, Security & Safety

Connect with us

  • Blog
  • Connect With Us on facebook
  • Connect With Us on instagram
  • Connect With Us on tiktok
  • Connect With Us on linkedin
  • Connect With Us on twitter
  • Connect With Us on youtube
  • Critical Information Summaries
  • Standard Agreement
  • Privacy, Security & Safety
© 2026 Singtel Optus Pty Limited
Optus acknowledges the Traditional Custodians of the lands, waters and skies across Australia. We pay our respects to Elders past and present and honour the strength and continuity of the world's oldest living cultures.